Uploading an SSL Certificate to DataCove
What is an SSL Certificate and how does it help improve my security?
Wildcard and Individual Certificates
Generating a Certificate Signing Request (CSR) for an Individual Certificate
Purchasing an Individual Certificate from a Certificate Authority (CA)
Uploading an Individual Certificate to DataCove
Resetting to a Self-Signed Certificate
What is an SSL Certificate and how does it help improve my security?
Secure Sockets Layer (SSL) Certificates are a fundamental component in the Public Key Infrastructure (PKI) system used to provide authentication of identity and are often then used for the subsequent encryption of communication with that newly authenticated system, such as with the HTTPS protocol that nearly every website uses today. SSL Certificates used to be “optional” for most websites and were largely only used by financial institutions or e-commerce websites as a means of proving they were who they said they were, but have become the standard for all websites due to browser-based enforcement that defaults to an encrypted method of communication (HTTPS) and alerts the user if HTTP is in use due to how easy-to-read its data is if intercepted (say, by an ISP, an attacker using a Man-in-the-Middle [MitM] attack, or any number of traffic sniffers that can be surreptitiously deployed onto a computer).
As an example, when you browse to www.Google.com, how do you know that that is Google’s website and not someone attempting to masquerade as them to harvest whatever data you put into the search bar or to otherwise attempt to hijack the session data from your browser? Back in the olden days before widespread SSL adoption, it was pretty difficult to know for sure and evil-twin or “misspelled” websites designed to look like the intended website were commonplace (and technically they still are, especially for phishing websites). Entering in your data in such a place could lead to immediate compromise and a wealth of malware downloaded onto your computer and/or identity theft issues in short order.
Largely driven by the explosion of e-commerce and the myriad online services that required sensitive personal information in the mid to late 2000’s, the desire for encrypted communications and the need to know the entity you were communicating with was whom they purported to be became extremely important with engaging potential clients into “trusting” the website. Thus grew the popularity of the Certificate Authority (CA), a critical cog in the PKI that validates websites as actually belonging to the company that owns them with various identification requirements to prove “ownership” of that website and domain.
With that ownership established, the CA would then issue an SSL Certificate to the website owner which they could then upload to the site. Any browsers henceforth connecting to the website would receive a copy of the public-facing information of that certificate that tells them who the site is and which CA validated them as such, followed by the establishment of an encrypted connection to that website so that any data flows back and forth between browser and webserver would then be much harder to read, even if intercepted.
This is now commonly displayed back to the user as a common “lock” symbol in the browser’s URL bar, which if hovered over will yield information about who verified that website. Clicking on the lock will offer up more specific and in-depth information about the certificate, including the CA who signed it, the website it’s for, the company information that was provided to generate that certificate and its expiration date. Much of this can be found under the More Information or Details sections, depending on the browser used.
In context of the DataCove, uploading an SSL Certificate is a first step in activating HTTPS-Only mode, wherein all clients connecting to the Datacove are then forced to use encrypted communications with the system; obviously valuable to a system that contains a copy of every user’s email across all time in one great repository. Without it, anyone sniffing the traffic of a standard unencrypted HTTP connection to a DataCove could then receive the data of every email being looked at or downloaded as an export; not a particularly pleasant thought.
Every layer of protection that can be added without causing onerous overhead to the use of the system is one that should be employed, and an SSL Certificate and HTTPS configuration for DataCove is a very quick and simple mechanism that can help protect your data, especially if the DataCove will be available over the open Internet for general access.
The below guide will go over the steps required to obtain an SSL Certificate and how to upload it to the DataCove.

Wildcard and Individual Certificates
For the purposes of SSL Certificates and DataCove, there are only two kinds of Certificates that matter: Wildcard and Individual.
Wildcard Certificates are almost always obtained at the organization level, and can be used to provide authentication to a large number of servers (sometimes capped at 100, but often unlimited). These are almost always used to secure the vast majority of an organization’s systems in via one single Certificate instead of purchasing Individual Certificates per machine, which would be costly and time consuming endeavor. One of the core differences between Wildcard Certificates and Individual Certificates is the use of a dedicated Private Key (another component of PKI) that all machines share, rather than the Individual Certificate’s unique Private Key per machine. While the scope of this article does not cover Wildcard Certificate acquisition and the minutia regarding them, it does detail how to install them to DataCove. If the plan is to use an available Wildcard Certificate for DataCove, skip ahead to the section concerning how to upload those near the bottom of this article.
Individual Certificates are just that: a dedicated Certificate that will be used on a single machine only. It will never, ever be used on another machine. These types of certificates get their start via a process known as a Certificate Signing Request (CSR), which is the process of entering in organization specific data about the particular system and having that system generate an unique Private Key that will then be used to generate a Public Key via the Certificate Authority (CA). This Private Key belongs to the machine that generated the CSR and is kept secret within, with the public key being part of the SSL Certificate that clients (browsers) will use to connect and authenticate it as genuine.
Either type of Certificate is fine for use with DataCove, but the Wildcard Certificate has different requirements for data upload. If those requirements can’t bet met, an Individual Certificate will need to be created. The steps to create one from scratch are below.
Generating a Certificate Signing Request (CSR) for an Individual Certificate
Creating a new Individual Certificate starts with a Certificate Signing Request (CSR). This is the “input” data that any Certificate Authority (CA) will need to generate a Certificate for your DataCove.
Start by launching a web browser and directing it to DataCove’s web interface. Log in and then navigate to Configuration on the top header menu, then select SSL Certificate Control on the left hand side menu.
Once there, select the CA Signed radio button, and click on the 1st option’s “click here” link to generate the CSR.

On the CSR generation page, there is a series of information fields that are used to identify both the DataCove system and the organization that it belongs to.
Note: This information is publicly available to anyone who reads the Certificate, so nothing sensitive should be placed in these fields.
Private Key length is often left at 2048 bit and is sufficient for most implementations.
The Country Name, State/Province Name and City Name should all be that of where the organization that owns the Datacove is located.
Organization Name is just that: the name of the Organization that owns the DataCove.
Organization Unit Name is a little more specific: this is usually the specific department at the company that administrates the system, most often IT.
Common Name is the most important entry: this should match that of the DNS “A” record that will be configured for people to reach the DataCove at, whether that is internal or external access.
Note: Most users do not type IP addresses to access a system; they type in a fully qualified domain name (FQDN), such as DataCove.Tangent.Com. These FQDNs are enabled by use of DNS services and the names chosen for each system are decided ahead of time by the system administrator. It is important to match the Common Name with that of the planned FQDN, as if the Common Name does not match the FQDN, the HTTPS handshake will report an invalid certificate.
6. Email Address is a support contact address for someone responsible for the DataCove at the organization, and is best set for an IT-specific distribution group like “HelpDesk@OrganizationName.com” to avoid notifications to any singular person.
7. Alternative Names are usually not needed, and some CAs may not support them. They are generally used if there will be multiple DNS records used to reach the system.
Once the fields are all populated, select Generate CSR.

DataCove will then provde a .CSR file with a green text burst at the top indicating a successful generation.
Download this .CSR file by right clicking on it and selecting Save Link As…
This file should be placed somewhere easily locatable, as it will be needed in the next step of purchasing a Certificate from a CA.


Some CAs allow for the upload of the CSR file directly, but others will want the data contained within copied and pasted into their respective validation tool. To that end, knowing how to read the data contained in the file is critical as it may be necessary to extract it for the CA chosen.
Navigate to the location where the CSR file was downloaded and right click on it. Using the Open With… command, select Notepad.
The CSR’s data will look much like the below. The content is a unique blend of the data entered in the previous steps along with internal codes from the DataCove that will operate with its newly generated Private Key. Use the CTRL+A command to select all text in the CSR file for a copy and paste, as this will be necessary for later steps.

With the CSR now in hand, we can move ahead to selecting a CA to purchase a Certificate from.
Purchasing an Individual Certificate from a Certificate Authority (CA)
Due to the aforementioned ubiquity of HTTPS-default web servers, SSL Certificates are no longer the expensive enhancement that helped reputable websites stand apart from the others. Prices have since been commoditized and SSL Certificates from reputable CAs are now available for a few dollars each from wholesale sites like SSLS.com all the way up to $250 for an SSL Certificate from top-of-the-line full service providers like DigiCert.com.
While Tangent does not officially endorse any SSL Certificate provider, from the editorial standpoint of DataCove Support, the value of SSLS.com for an Individual Certificate at less than $10 is difficult to pass up. If truly looking for an SSL management platform however, DigiCert is hard to beat. For the purposes of this article, SSLS.com will be used.
For reference, DataCove’s webserver is based on LightTPD, which is similar enough to Apache to where most Certificates created for Apache will work on DataCove, so long as they are in the format DataCove accepts (.CRT). If your preferred CA provides a list of webservers that the Certificate they generate is designed for, using ‘Apache’ or ‘Other Webserver’ should also work for DataCove. Be sure to check the filename extensions to verify they are output in the .CRT format.
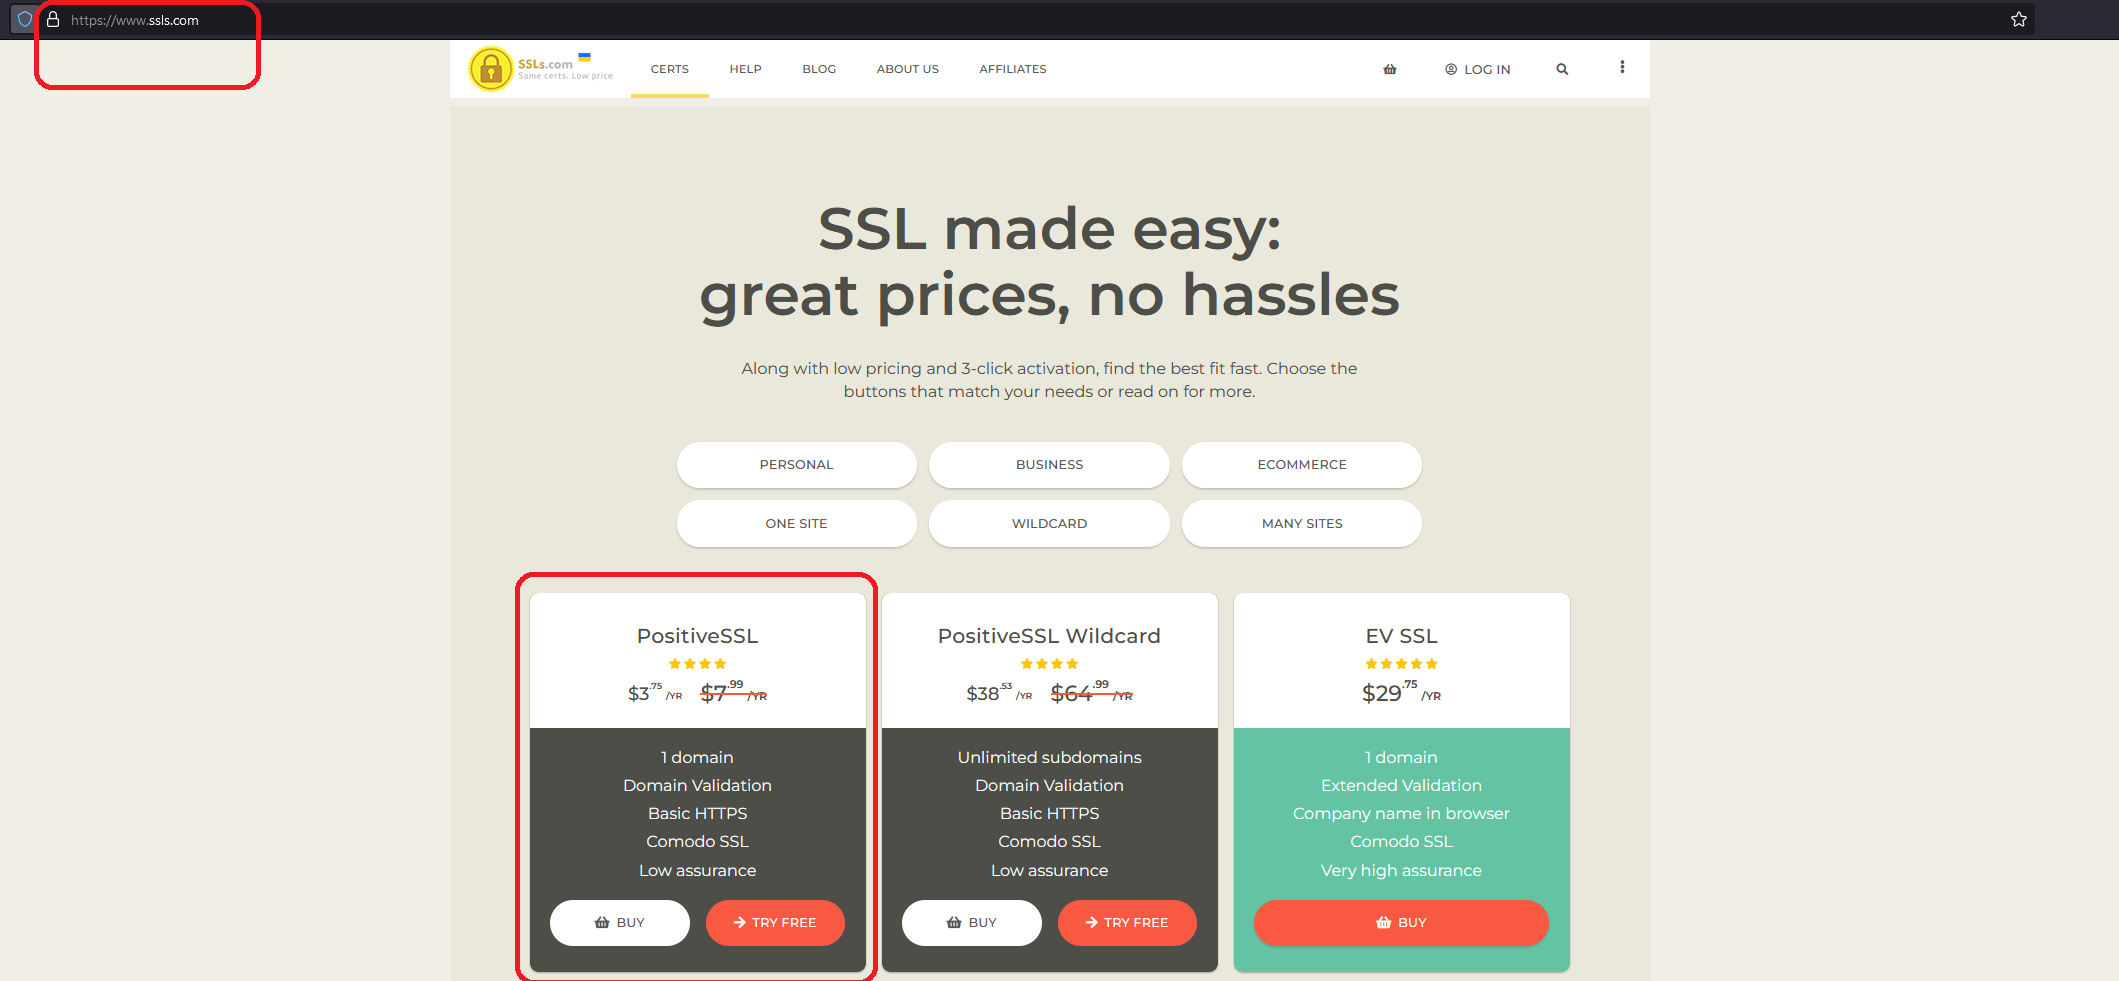
Begin by opening a web browser and navigating to SSLS.com.
Select “Buy” under their PositiveSSL with Domain Validation product from their homepage listing.
Select the duration of the Certificate in years desired for purchase.
Note: SSLS.com, as well as most providers, offer discounts for multiple year purchases. SSL Certificates must be “reissued” annually even when purchased in multiple year durations, so the practical difference between single year and multiple year Certificate purchases is monetary only. It is recommended to purchase a comparable duration of SSL Certificate to match the subscription length of your DataCove.
Set the quantity of Certificates to purchase as 1, then click Checkout.

SSLS.com will request the setup of an account with them to track these SSL Certificates being purchased.
Populate an email address that you have access to and click Yep, Done.

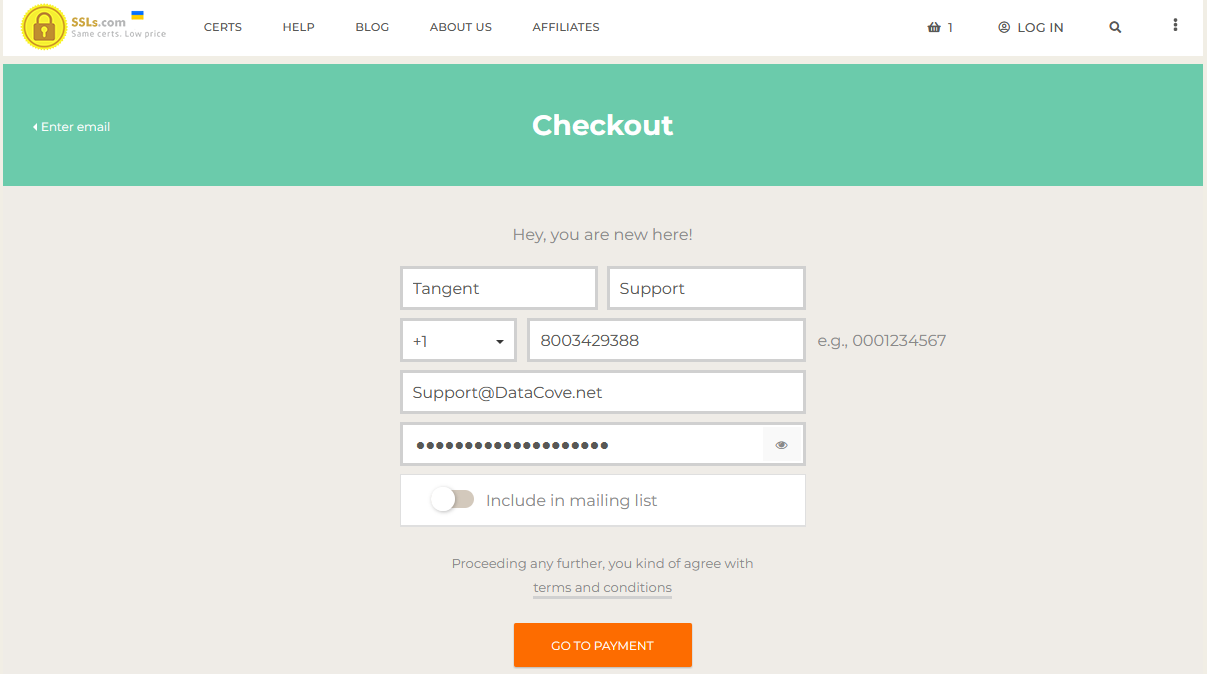
Once an email address is in, SSLS.com will ask for some further information to ensure repeatable access to the account.
Populate these fields accurately, as they will be needed for billing, then select Go To Payment.
Process the purchase of the SSL Certificate and prepare to Activate the Certificate.

Activation of the Certificate starts by defining which domain or subdomain the Certificate is designed to protect.
Populate this with the same Common Name (FQDN) that was used during CSR generation.
Once the FQDN has been entered, SSLS.com will break out the domain and ‘www’ subdomain that Certificate will be designed to protect.
Confirm the accuracy of the name for any misspellings, and if good, click Onwards.


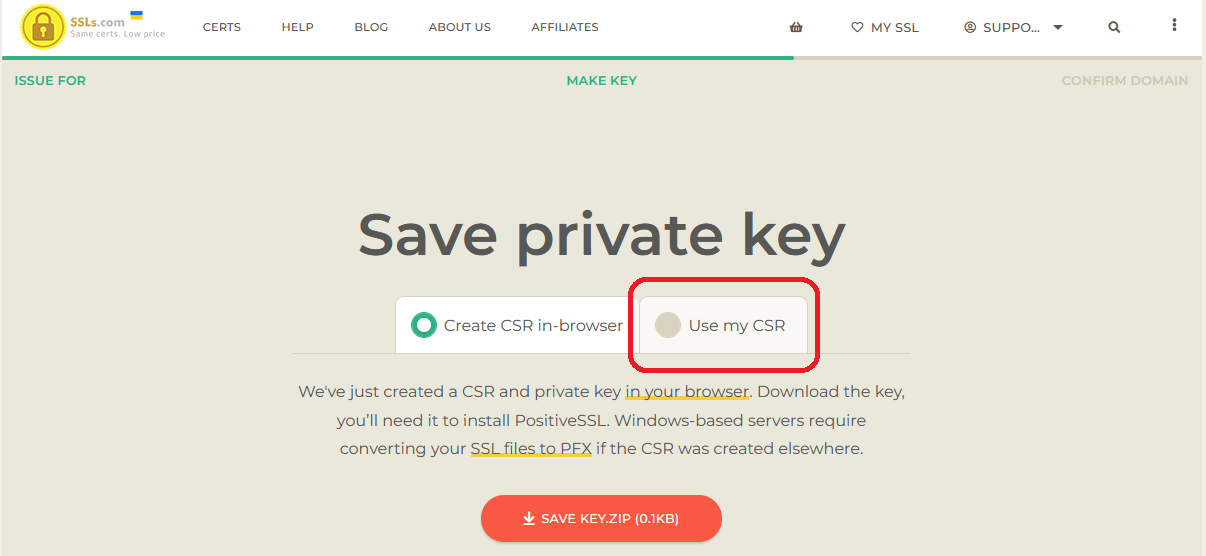
The next page will offer two choices: Create CSR In-Browser or Use My CSR.
Creation of the CSR In-Browser is a means of creating Certificates without generating the CSR on the DataCove first, and generates a Private Key (another component of PKI) outside of the DataCove instead of hidden away inside of it. This is another means of accomplishing the same goals, and is especially useful for generating Wildcard Certificates, but is not necessary in this case.
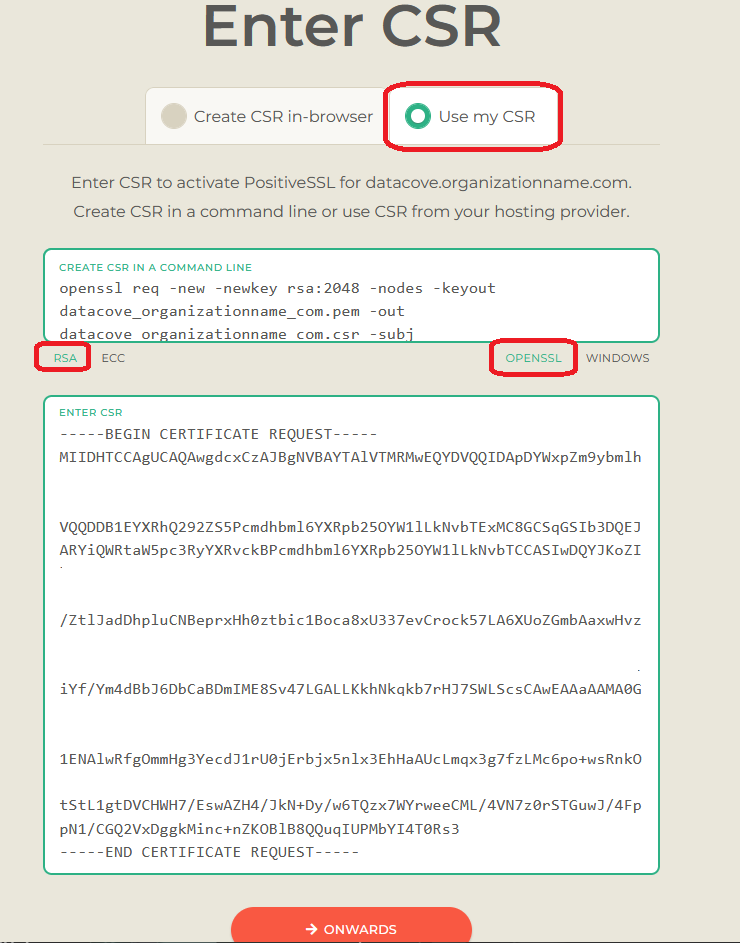
Select Use My CSR.
Leave the default RSA and OPENSSL options selected, and then copy and paste the CSR content into the Enter CSR field towards the bottom of the screen.
Note: Changing the RSA/OPENSSL options to any other options will result in Certificates being created in different file formats meant for different operating systems. It is imperative to keep them in the formats of RSA and OPENSSL for this Certificate to function with DataCove.
Ensure there are no trailing spaces after the ——-End Certificate Request ——- section.
Click Onwards once fully populated.
If the CSR information matches the Common Name the system is for, it’ll provide a success notification.
If the CSR information doesn’t match, a warning popup will appear. If it does, carefully recheck the text typed in for the domain, as any single character that is incorrect will make the Certificate useless. Selecting the “Use CSR Domain” option will choose the option that is embedded in the CSR itself, but that is worth rechecking to ensure it is what was intended as well.


SSLS.com will now move on to the Confirmation of Domain section.
Discussed previously, the CA needs to validate that the system being granted this Certificate is owned by the domain it is intended to be placed upon. This is known as Domain Validation and abbreviated as “DV” in the CA world.
There are a few different ways to conduct this, ranging from receiving an email at one of the common addresses used by an administrator of the domain, uploading a validation file to the web server of the root domain, or creation of a public DNS record that SSLS.com can verify. All three options are fairly flexible for a domain administrator or network administrator, with email and DNS records generally being the most rapid.
If choosing the email option, be sure that one of the email addresses specified is available on your domain and that you have access to it. SSLS.com will send an email to this address with a validation link to press and further instructions.
Note: If the email address does not exist, creating it and a mailbox for it is a fairly quick way of validating domain ownership.

If the email address is not available and cannot be created, the DNS Record option is also very quick.
To implement the DNS record, select that option and click Submit.

The page will now reflect back with specific new information to upload to your organization’s public facing DNS services.
Note: Some organizations use different internal DNS servers from their external ones; be sure that this record is emplaced upon the external DNS servers, as the authentication of the record will fail otherwise.
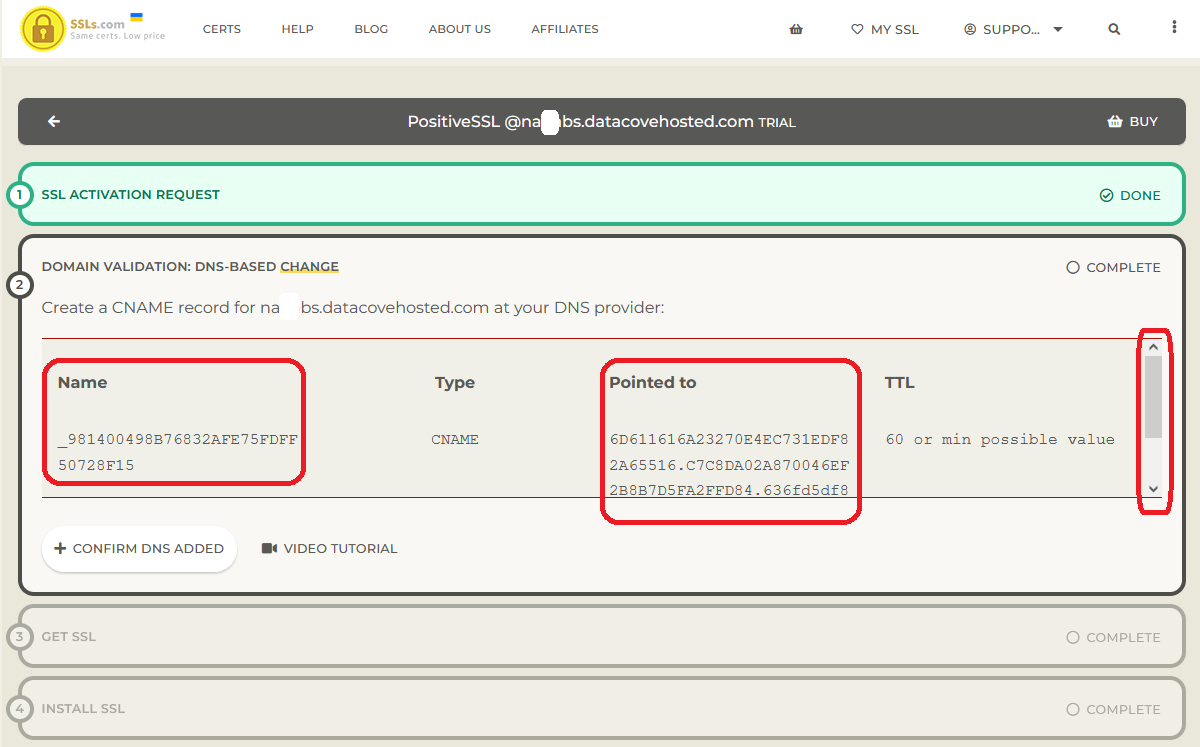
Specifically, a Canonical Name (CNAME) record, also known as an Alias record, is being requested to be created on your DNS server with very specific content that the CA will use to validate the domain ownership.
In the below example, a unique string of characters is being used for the Name and is being requested to point that at a very long alphanumeric address. These data fields must be copied and pasted (or manually retyped) into your DNS server New Record creation tool.
Clicking on the text underneath the ‘Name’ and ‘Pointed To’ fields will automatically copy the text to your clipboard, but some browsers may not offer this and using the scrollbar on the right to ensure all of the text is copied may be required.
The Time-To-Live (TTL) field should be set as low as your DNS server allows, but most will offer 60 minutes as a solid default option.
A GoDaddy based example of the matching DNS entry is below.

Once the CNAME record has been added to your DNS server, switch back to the SSLS.com browser tab and select the “Confirm DNS Added” button to have SSLS.com run a DNS lookup on your domain to verify that the CNAME record is present and accurate.
Depending on your DNS provider, the record may take some time to go live (ranging from 10 seconds from big name domain registrars to up to 30 minutes for smaller or private DNS servers), so if it does not register as correct right away, wait a few minutes and then retry.
If the record continues to fail after 10 minutes, recheck the content that was copied and pasted into the DNS record for any preceding or trailing spaces in the text, or any sections that may have been cut off.

A failure to authenticate the record will appear with lots of red and pink coloration for clarity of the error.

After waiting a couple of minutes, clicking the “Confirm DNS Added” button again now comes back with positive results; a simple DNS propagation delay merely took some time to make the record available.
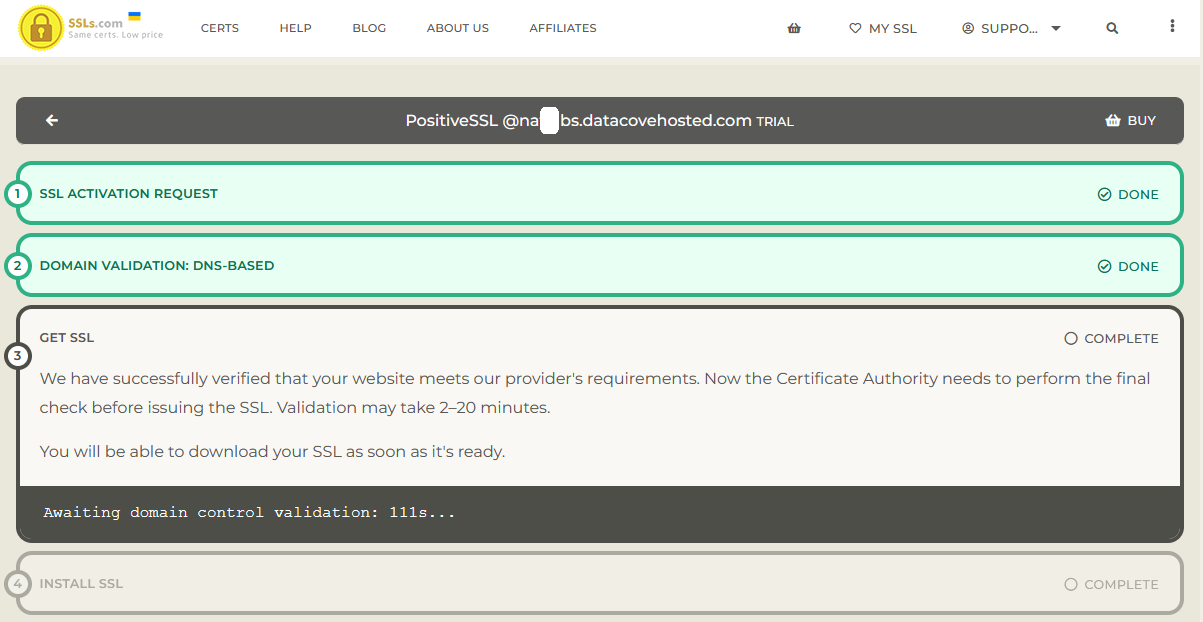
Now that SSLS.com (the wholesaler/reseller) has verified that the DNS record exists, they will send a request over to the CA (Sectigo, in this case) who will likewise verify the record is accurate and matches that of the CSR before generating the Certificate. This process can take a few minutes also, and SSLS.com has a default two minute window for this to occur within.
In the event of CA verification taking longer than that two minutes, a blue text popup will appear letting you know that the process is taking a bit longer than usual, and to retry the check again in 15 minutes.
To run the recheck, click on the Try Again button.

Once the CA verification is completed and the file is ready for download, click on Download SSL to bring the Certificate down onto your local computer.
Next, we move on to Uploading the Individual Certificate to DataCove.

Uploading an Individual Certificate to DataCove
With the SSL Certificate now downloaded, locate it on your local computer and decompress it from the .Zip file it came enclosed in.
The name of the .Zip file will be that of the Fully Qualified Domain Name that the Certificate is designed to protect, along with an underscore and the text of “cert” to describe what it is.


Once decompressed, open the directory to see the file contents. Three files will be enclosed:
A Certificate Authority Root and Intermediate “bundle” file.
The Individual Certificate in the .CRT format.
A combined Intermediate and Individual Certificate file as a .P7B file.
These files are meant for different webserver types and different platforms, with this combined set of them meeting most Linux webserver needs.
For DataCove’s webserver, we only need the .CRT file.

Navigate back to the DataCove web interface and use the top header menu to reach Configuration, then the left hand side menu to reach SSL Certificate Control.
From here, select CA Signed and then the second “click here” link for uploading a Certificate that you already have.

On the Certificate upload page, select locate the Domain Certificate field and click Browse…
Navigate to the downloaded and decompressed folder containing the Certificates, and select the file ending in .CRT.
Once the file is in place, click Save.

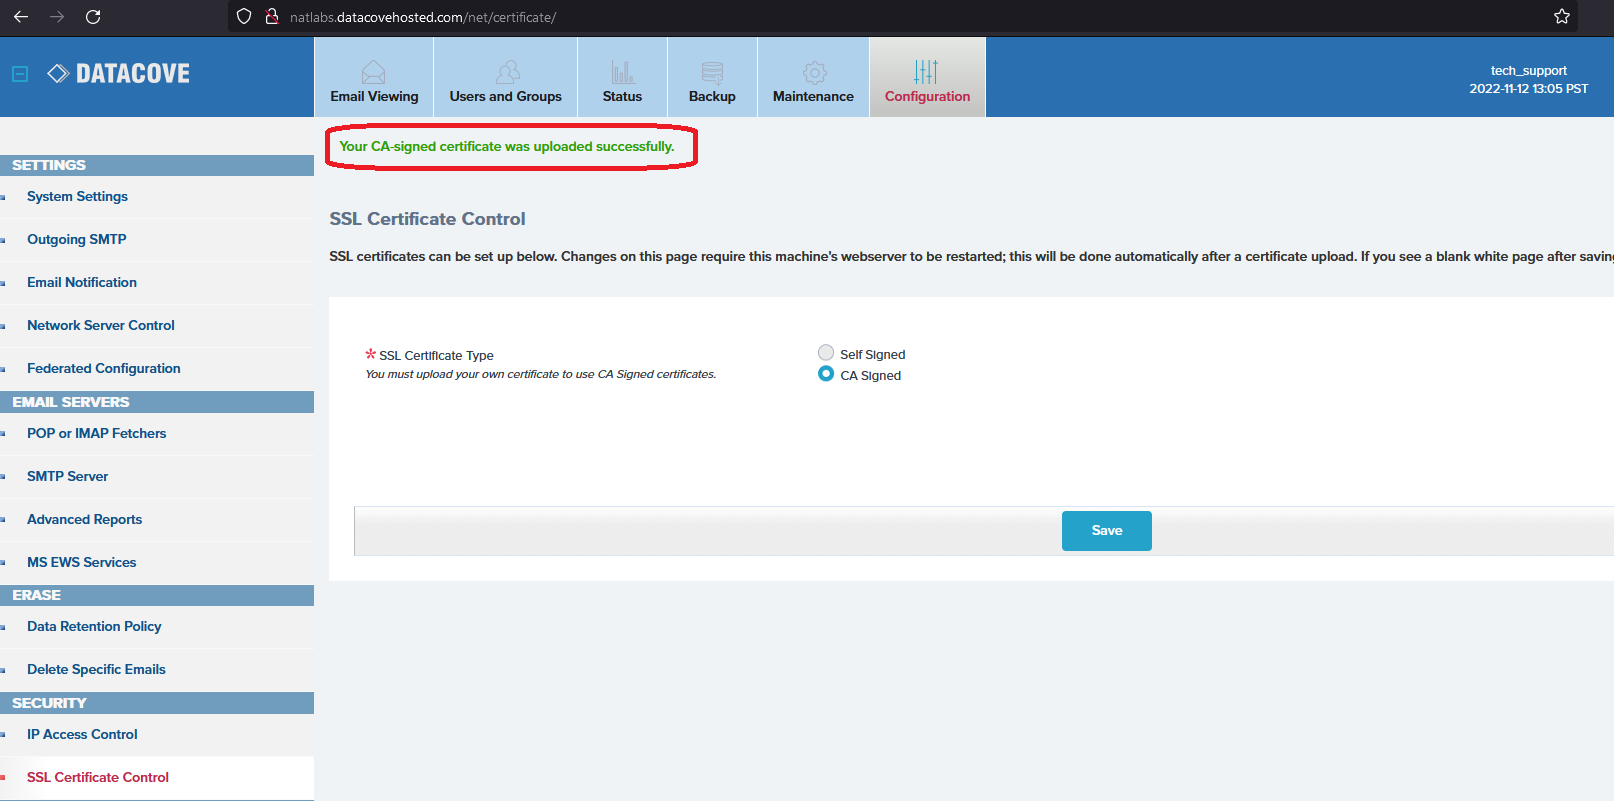
DataCove will then refresh the SSL Certificate Control page and offer green text at the top of the screen stating a successful upload of the Certificate.
The SSL Certificate Control page should now reference “CA Signed” as the type of Certificate being used.
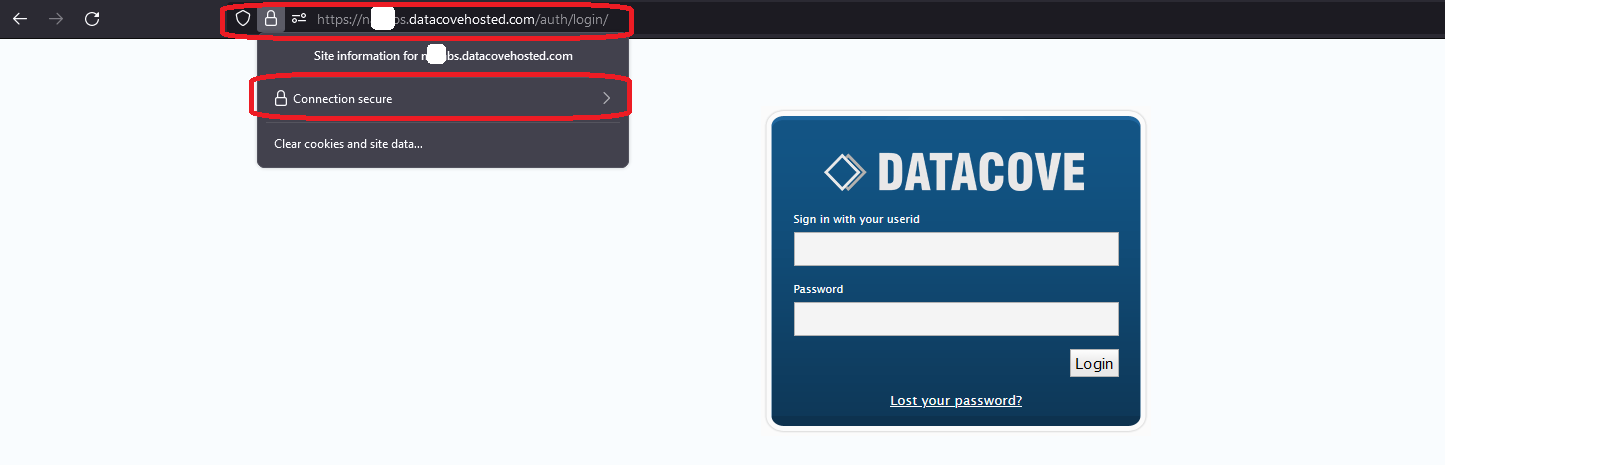
It is always prudent to test the HTTPS connectivity that is expected post-Certificate upload. This can be accomplished by changing the URL slug being used to reach DataCove and appending an “S” after the HTTP portion, and then pressing Enter to go to that page under the new protocol.
If the new Certificate is successful, your browser should display the lock icon and no error page will appear saying that this is an untrusted site for any reason.
Clicking on the Connection Security details will also yield additional information about which CA has validated your website.
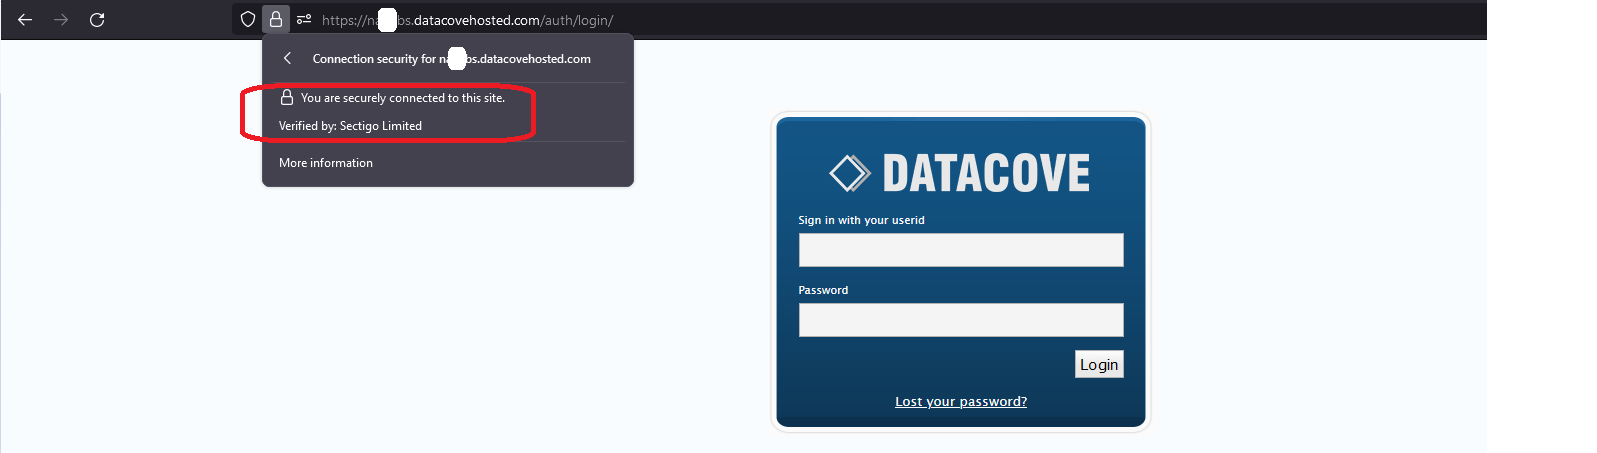
A valid CA-Signed SSL Certificate is now live on the DataCove and all future HTTPS connections will no longer throw untrusted website alerts.
It is now possible to institute HTTPS-Only access to DataCove in a safe manner, which will force all browser based communication with the DataCove to be encrypted, keeping it safer.
A guide on how to configure HTTPS-Only mode is included in another Knowledge Base article here: https://datacove.net/knowledge-base/activating-https-only-mode-for-datacove
This concludes the Individual Certificate setup and upload for DataCove.
Applying an already available Wildcard Certificate
Wildcard Certificates are generally used for DataCove when such a Certificate is already used at the organization and for the many servers within it, and possessing one consequently implies that the administrator already has more than a passing familiarity with SSL Certificates and their purpose. With those considerations in mind, this section of the article will skip over SSL Certificate principles and jump straight to the meat and potatoes.
Begin by locating and identifying the necessary Certificate files. Two, sometimes three, files are necessary for Wildcard Certificates to function on DataCove:
Intermediate Certificates (also known as Chained-Root Certificates) are the “sometimes” needed file; these may be needed to extend the CA’s information from the Domain Certificate to make for a fully qualified Certificate that web browsers will trust. If one was provided by your CA, use it. If multiple Intermediate Certificates are provided, they may need to be concatenated into one file and then uploaded. This file should be presented to DataCove in the .CRT format.
Domain Certificate is the critical file that the DataCove will use for its Certificate and will feature the name of the domain. This file should be presented to DataCove in the the .CRT format.
Private Key is the “secret password” that all systems using this Wildcard Certificate will use for their internal encryption and decryption of data. This Private Key was made during the original issuance of the Wildcard Certificate from the CA and was likely kept with its file package when downloaded. This should be presented to DataCove in the .KEY format.
Note: If the Intermediate Certificate or Wildcard Certificate in possession is not in the .CRT format, check with your SSL Certificate Provider if they allow you to download the Certificate again in a different format. This is the easiest and best option for SSL conversions. If they do not allow for reformatting of the Certificate, see the below section for Converting SSL Certificate Formats.
Example files pictured below.

Start by launching a web browser and directing it to DataCove’s web interface. Log in and then navigate to Configuration on the top header menu, then select SSL Certificate Control on the left hand side menu.
Once there, select the CA Signed radio button, and click on the 2nd option’s “click here” link to go straight to the upload form.

The SSL Certificate upload form will have three fields defined:
Intermediate Certificate
Domain Certificate (required)
Key File (required)
Select Browse… next to each of these fields and direct the dialog box towards the files.

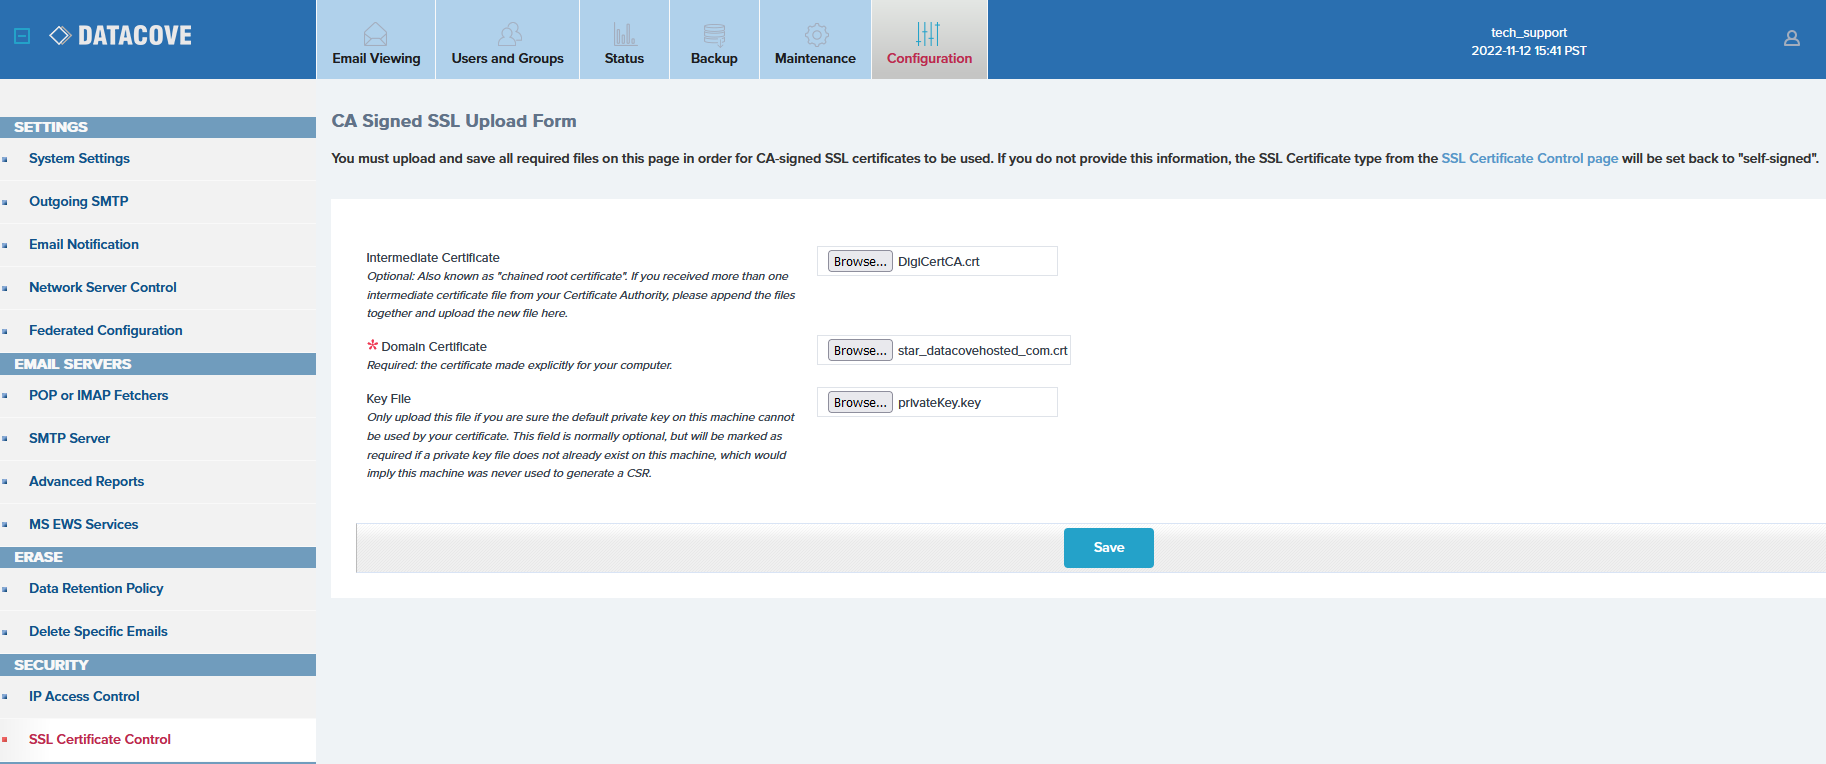
Once the files are loaded up, select Save.
DataCove will then refresh the SSL Certificate Control page and offer green text at the top of the screen stating a successful upload of the Certificate.
The SSL Certificate Control page should now reference “CA Signed” as the type of Certificate being used.

It is always prudent to test the HTTPS connectivity that is expected post-Certificate upload. This can be accomplished by changing the URL slug being used to reach DataCove and appending an “S” after the HTTP portion, and then pressing Enter to go to that page under the new protocol.
If the new Certificate is successful, your browser should display the lock icon and no error page will appear saying that this is an untrusted site for any reason.
Clicking on the Connection Security details will also yield additional information about which CA has validated your website.


A valid CA-Signed SSL Certificate is now live on the DataCove and all future HTTPS connections will no longer throw untrusted website alerts.
It is now possible to institute HTTPS-Only access to DataCove in a safe manner, which will force all browser based communication with the DataCove to be encrypted, keeping it safer.
A guide on how to configure HTTPS-Only mode is included in another Knowledge Base article here: https://datacove.net/knowledge-base/activating-https-only-mode-for-datacove
This concludes the Wildcard Certificate setup and upload for DataCove.
Resetting to a Self-Signed Certificate
In the event of the inadvertent upload of an incorrect SSL Certificate, an error with uploading an SSL Certificate or any other need to reconfigure the DataCove to resume using its built-in self-signed certificate, resetting the DataCove’s SSL Certificate back to the default self-signed certificate can be performed via the console menu.
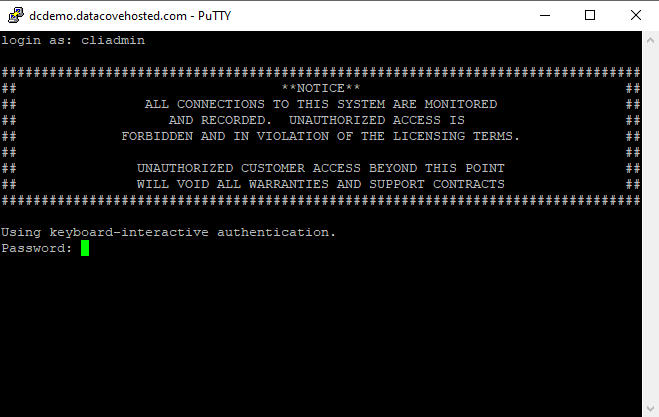
To do this, open a SecureCRT or Putty terminal and connect to the DataCove via SSH over TCP 22.
Log in with the username “cliadmin” and the password. If the password has not been changed, use the default password of “ChangeMe”.
Once logged in, select option 7 for Security Reset Options, then option C to reset to the self-signed certificate, then option Y to confirm.
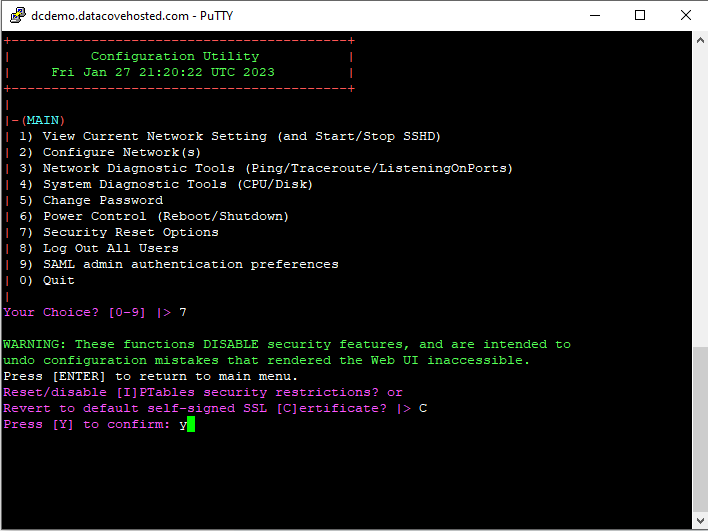
Once executed, the DataCove will dispose of any SSL Certificate information it has and generate a new self-signed Certificate.
Any new Certificate Authority-signed SSL Certificate can then be uploaded, if necessary.
Converting Certificate Formats
In some scenarios, the SSL Certificate Provider may have sent the Certificate for your DataCove in a format DataCove cannot use. This is most often the case with Wildcard Certificates, as those are generally pre-existing in a format that the organization normally uses, which DataCove’s LightTPD may not be able to work with.
The general recommendation is to inquire with your SSL Certificate Provider for Certificate’s in a format DataCove can use directly (the .CRT format, specifically), but in situations where this is not possible, many SSL Certificates are ‘convertible’ into different formats.
SSLShopper.com provides a very handy tool to convert SSL Certificates from one format to another without having to use command line tools like OpenSSL for the conversions, and their website and tool can be found below. Tangent does not endorse nor warrant SSLShopper.com for any purpose; this third party link is provided entirely for ease of use and any activity at that site is subject to SSLShopper.com’s Terms and Conditions.
https://www.sslshopper.com/ssl-converter.html
Common Certificates that need conversion are in the .CER and .PFX formats, and uploading one of these to SSLShopper’s converter (via the Browse… function) will allow that service to “read” the Certificate and provide a list of output formats.

Unless SSLShopper provides a direct .CRT file output, you may need to select the Standard PEM option for converting other SSL Certificate types to DataCove’s needed .CRT format.
In this context, the .PEM file that SSLShopper provides will be a concatenated single file that will need to be manually broken apart and saved separately at the end of every Begin Certificate and End Certificate section.
This is performed by opening the .PEM file with Notepad or Wordpad and then copying and pasting the “paragraphs” into entirely new Notepad files, then saving them in the .CRT and .KEY formats, respectively. Care should be taken to avoid preceding or trailing spaces with the dashes that bracket the “Begin Certificate Request” and “End Certificate Request” lines. They will look very similar to the .CSR file used to request a Certificate in the first place, pictured below.

SSLShopper.com also provides a list of the OpenSSL commands they use to convert these Certificates, which can be used independently if the Certificates are not allowed to be uploaded to third party sites.
To do so, the OpenSSL Toolkit for Windows should be installed to add this functionality to Windows.
TheSecMaster.com has a handy guide on how to download and install the OpenSSL Toolkit and a link to that guide is provided below. Tangent does not endorse nor warrant TheSecMaster.com for any purpose; this third party link is provided entirely for ease of use and any activity at that site is subject to TheSecMaster.com’s Terms and Conditions.
https://thesecmaster.com/procedure-to-install-openssl-on-the-windows-platform/
Once the OpenSSL Toolkit for Windows is installed, running the OpenSSL commands pertinent to converting the Certificate you have into the Certificate type needed for DataCove is all that is necessary, followed by any disassembly of concatenated files.
Additional third party guidance for extracting separate Certificate and Private Key files from a .PFX file can be found at the below Parallels.com Knowledge Base article. This variant uses their OpenSSL package (downloadable under Step 1 of their guide) to provide the needed command support and allows for easy extractions as well. Tangent does not endorse nor warrant Parallels.com for any purpose; this third party link is provided entirely for ease of use and any activity at that site is subject to Parallels.com’s Terms and Conditions.
https://kb.parallels.com/123890
