Activating Office 365 Journal Report Decryption
Background and history of protected messages
Many organizations are familiar with and have used Microsoft Exchange’s Information Rights Management (IRM) protections for email messages for over a decade. IRM provides many useful security functions to prevent unauthorized access of the messages and their content, but there have always been limitations to it that could not be addressed easily, especially that of sending messages with sensitive content to external organizations. When IRM-protected messages are journaled, that journaled copy will get routed to the journaling mailbox as per normal, but DataCove would not be able to read them since that journaling account is generally unknown to the users sending IRM-protected messages around, so it never receives an explicit authorization for access.
Such messages would not necessarily be easy to find, and their content would generally wind up being unable to be “discovered;” not a good thing from the investigative and eDiscovery standpoints.
This lead to a compliance conundrum that Microsoft eventually built a configurable toggle for in Exchange 2010: Journal Report Decryption. Activating this feature allows for journaled copies of IRM-protected messages to be stripped of those IRM protections, so that once ingested into DataCove, those messages will display just like any other message.
Regular intended recipients of the messages are still subject to the IRM protections, just not the journaled copy that DataCove receives.
Present day encrypted messages
Microsoft has since introduced Office 365 Message Encryption (OME) as the upgraded version of IRM for organizations on Office 365, which by nature of retaining the message strictly on Office 365, mitigates many of the old IRM related shortcomings.
Emails sent with OME enabled never truly leave Office 365’s servers; instead, only a “stub” of a message is sent to the recipient which essentially tells them to sign in to Office 365 and authenticate themselves to read the message.
Other authentication options exist for non-O365 recipients, but those are beyond the scope of this article.
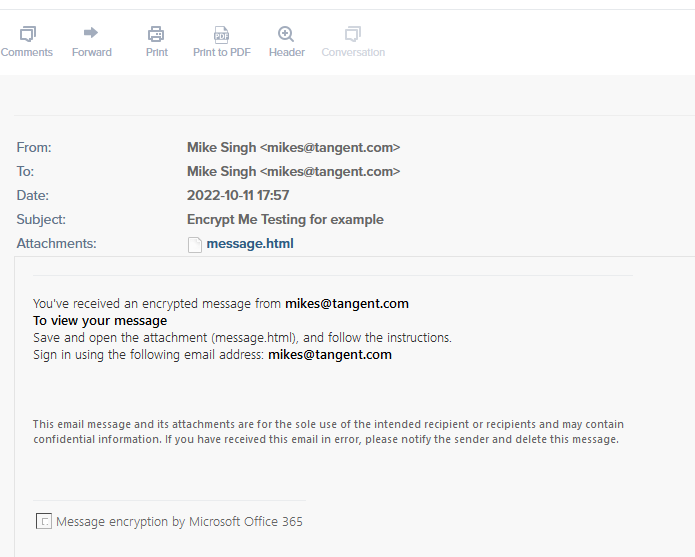
When DataCove receives a journaled copy of the messsage, we likewise only receive the “stub,” which is not that useful from a compliance standpoint since we can’t see any content of the message. Below is an example of what both the recipient and the DataCove would receive. The attached “message.html” is essentially just the same content displayed in the email body, but not the actual message.
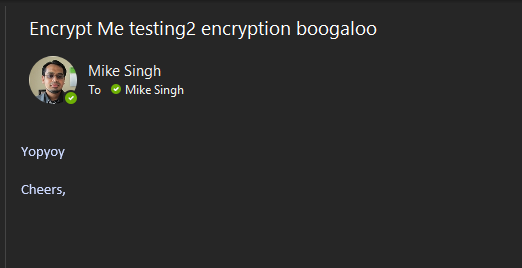
This was the actual message:
In order to obtain access to this message, we’d have to use some fairly intrusive methods to gain access, such as changing the password of the recipient’s account and logging in as them. This obviously isn’t a good idea for an internal investigation and can really muddy the waters in terms of data spoliation for a full-on eDiscovery, and is really only safe to use for recipients who are no longer be with the organization.
Luckily, Microsoft has provided the same Journal Report Decryption functionality for OME messages, but they haven’t exactly come out and declared that function as such, at least not by the time of this writing.
Activating Journal Report Decryption in Office 365
The article linked below covers the commands for how to enable Journal Report Decryption, but astute readers will notice that it technically states it is only for Exchange 2013. With Office 365 effectively just running on the latest builds of Exchange 2013 and its successors of 2016, 2019, etc, the command still works for activating decryption. Microsoft simply has not updated their article to report this benefit.
Microsoft article: https://learn.microsoft.com/en-us/exchange/enable-or-disable-journal-report-decryption-exchange-2013-help
The below simple steps cover how to use PowerShell to activate Journal Report Decryption for Office 365:
1. Launch PowerShell from your workstation.
2. Connect and authenticate to Exchange Online.
Official Microsoft article that covers how to do so: https://learn.microsoft.com/en-us/powershell/exchange/connect-to-exchange-online-powershell?view=exchange-ps
For the quick copy and pasters out there, type the following: Install-Module -Name ExchangeOnlineManagement
PowerShell will prompt with a couple of questions to download a newer version of NuGet. Select “Y” for this.
Powershell will then prompt a risk notice that this package is coming from an untrusted repository known as PSGallery. Select “Y” for this.
As the script we’ll be running is a RemoteSigned script, we’ll need to allow that in the Execution Policy.
Type the following command: Set-ExecutionPolicy Remote Signed
PowerShell will prompt with a risk notice since this can allow the execution of potentially dangerous scripts. Select “Y” for this.
Once the policy is set, type: Import-Module ExchangeOnlineManagement
This will load the formal componentry we need to push proper policies up to Office 365’s Exchange Online system.
Now, we’ll need to actually connect to Exchange Online.
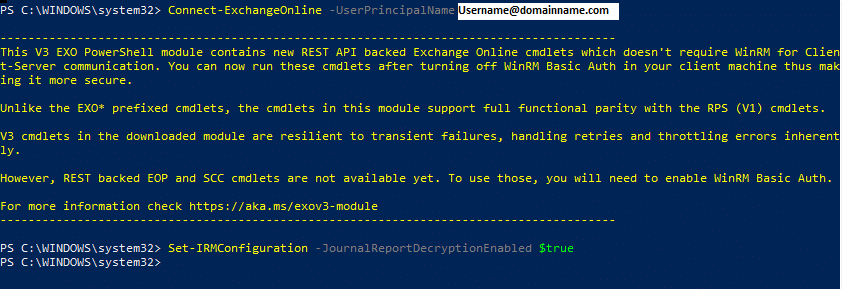
Type the following command: Connect-ExchangeOnline -UserPrincipalName Username@domainname.com
Replace the Username@domainname.com with your administrative credentials for Exchange Online.
3. We can now run the actual configuration change command.
Type the following command: Set-IRMConfiguration -JournalReportDecryptionEnabled $true
Once this command completes, we can then test the functionality.
Testing is as simple as sending an OME protected message to someone and then reviewing what the journaling account received. The messages should appear like the examples further below.
As demonstrated above, an OME protected message is effectively just a stub of a message without much content for discovery purposes. Once Journal Report Decryption is enabled however, the content changes to reflect what the message sent actually looks like to the recipient.
What was sent:
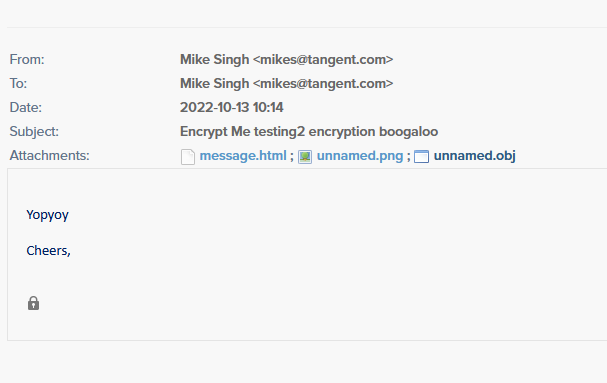
What was received by DataCove:
Note that there are some differences between the original Pre-decryption Stub message and this one: the “Message Encryption by Office 365” text is gone, but now it shows the lock icon that was otherwise held as an attachment prior.
Other text formatting differences can be seen in other messages; this seems to vary depending on the content of the message and version of Exchange Online handling it and may change over time in the future.
The Petri.com article listed further below can offer additional examples and information on this.
For our intents and purposes, we can read the content and any attachments at this point and the message will be just as searchable as any other contained on DataCove.
Sources
Further reading from Microsoft:
Introduction to Information Rights Management for emails, including what it is and how it works: https://support.microsoft.com/en-us/office/introduction-to-irm-for-email-messages-bb643d33-4a3f-4ac7-9770-fd50d95f58dc
Information Rights Management on Exchange Servers: https://learn.microsoft.com/en-us/exchange/policy-and-compliance/information-rights-management?view=exchserver-2019
Information Rights Management in hybrid environments: https://learn.microsoft.com/en-us/exchange/irm
Further reading from third parties:
Petri.com article from May 2020 that adds several other insights, especially as to the future of sensitivity labeling: https://petri.com/how-exchange-online-processes-journal-reports-protected-email/


